Introduction
Before getting on to the description for the installation, this part will give a general information about it. Actually, SQLite3 is an alternative tool for managing data. Moreover, using SQLite3 has its own advantage since it will just focus in data processing itself. Basically, SQLite3 limit several administration and configuration aspects in order to keep it simple. So, SQLite3 user will just focus using the appropriate syntax for data processing instead of doing other administration and configuration aspects of the database. In other words, using SQLite3 database is very simple. This article is using a machine runs using a Microsoft Windows 10 operating system.
SQLite3 Installation Step in Microsoft Windows
The sequence order for installing SQLite3 only consists of several steps. Actually, it is more likely to have an SQLite3 setup rather than an installation process. In this part, the installation itself consist of two parts. The first one is the part for setting up or installing the SQLite3 database itself. The next one is the part where the focus is just to make SQLite3 execution is possible in every path in the machine.
SQLite3 Installation Part
The setup or the installation part basically is very simple because it consists of several steps as follows :
-
Just access the SQLite3 official website exist in this link. With the download page exist in this link in order to retrieve the SQLite3 binary file for the Windows operating system.
-
There are several versions of the SQLite3 binary file available for download in that page exist in this link. Make sure to choose the right version or the suitable one.
-
In this case, since the process is in the Windows operating system with a 64-bit architecture, just choose the SQLite3 binary file with the suitable version. At the time, it exist in this link as the SQLite3 with the 64-bit DLL (x64) for SQLite version 3.37.0.
-
If the download process for the SQLite3 binary file is a success, there will be a compressed file with the name of ‘sqlite-dll-win64-x64-3370000.zip’ in the Downloads folder inside the Users’ folder.
-
Next, extract the sqlite-dll-win64-x64-3370000.zip file. So, after the extraction process, there will be a new folder with the content of the following :
C:\Users\Administrator\Downloads\sqlite-dll-win64-x64-3370000>dir
Volume in drive C has no label.
Volume Serial Number is FC64-E91F
Directory of C:\Users\Administrator\Downloads\sqlite-dll-win64-x64-3370000
14/12/2021 08:10 <DIR> .
14/12/2021 08:10 <DIR> ..
27/11/2021 22:06 551.424 sqldiff.exe
27/11/2021 22:07 1.083.392 sqlite3.exe
27/11/2021 22:07 2.066.944 sqlite3_analyzer.exe
3 File(s) 3.701.760 bytes
2 Dir(s) 325.927.911.424 bytes free
C:\Users\Administrator\Downloads\sqlite-dll-win64-x64-3370000>
-
In order to keep it more simple, just move it to another shorter path. For an example ‘C:\sqlite3’. According to the context path of ‘C:\sqlite3’, just create a new folder in the ‘C:’ driver with the name of ‘sqlite3’. Along with that, just move all the files exist in the folder available in the previous step which in this case is ‘sqlite-dll-win64-x64-3370000’ to the ‘C:\sqlite3’ folder path.
-
In order to test the SQLite3 tool in ‘C:\sqlite3’ folder, just go directly to ‘C:\sqlite3’ and type ‘sqlite3’ to run it as follows :
Microsoft Windows [Version 10.0.18363.628]
(c) 2019 Microsoft Corporation. All rights reserved.
C:\Users\Administrator>cd \
C:\>cd sqlite3
C:\sqlite3>sqlite3.exe
SQLite version 3.37.0 2021-11-27 14:13:22
Enter ".help" for usage hints.
Connected to a transient in-memory database.
Use ".open FILENAME" to reopen on a persistent database.
sqlite>
SQLite3 Configuration Part
As soon as the SQLite3 tool execution is a success as it exist in the previous part, there is another important step after. That step is actually an additional purpose in order to be able to run or to execute ‘sqlite3’ command in every path exist in the machine. The following are the steps to achieve it :
-
Type ‘environment variable’ in the search text field in the Windows as follows :
How to Install SQLite3 in Microsoft Windows -
Click and Run the ‘Edit environment variables’ as it exist in the above output image, suddenly the following window will appear :
How to Install SQLite3 in Microsoft Windows -
Following after, just click the Environment Variables… button where the following window of the Environment Variables will appear :
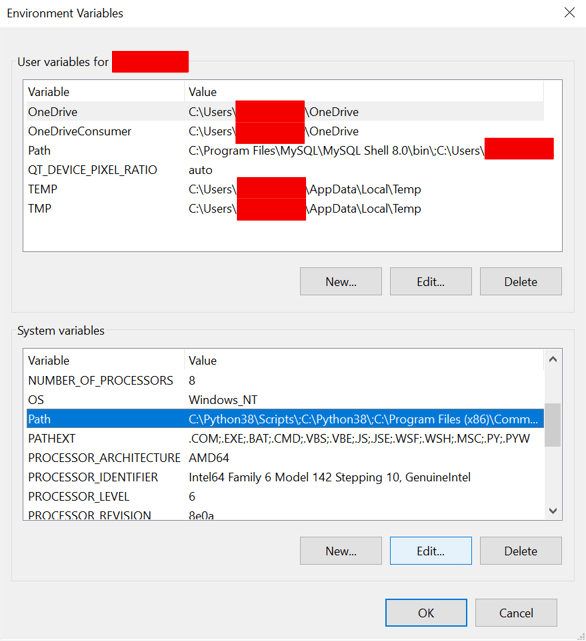
How to Install SQLite3 in Microsoft Windows In order for the execution of ‘sqlite3.exe’ file is possible in every path available in the machine, add the ‘C:\sqlite3’ path to the ‘Path’ variable. It is a system variable of the environment system. Just do it first by selecting the environment variable with the name of ‘Path’ in the system variable part as in the above image.
-
The following is the window showing the environment variable with the name ‘Path’ in the edit state. Just Click new and add a new path with the value of ‘C:\sqlite3’ as follows :
How to Install SQLite3 in Microsoft Windows After that, just execute ‘sqlite3’ command in any other path beside ‘C:\sqlite3’. For an example in the default path exist in ‘C:\User\Administrator’ as follows :
How to Install SQLite3 in Microsoft Windows