Introduction of osTicket
The subject in this article is the installation process of osTicket in Linux Ubuntu 18.04 Bionic Beaver. As a web-based application, osTicket is one of the most widely-used open source support ticket system. For more information, just check the official website of osTicket in this link.
osTicket Installation Step
There are several steps for installing osTicket. The installation consists of several parts. Each part has a specific purpose. The first part is the downloading part. The next part is the configuration part of the Apache Webserver. The last part, it is the installation of the osTicket itself. So, the following below are the list of those parts.
Downloading the osTicket file installation
Currently, the download process is available with several choices and options in this link. Below is the steps for selecting the download options :
a. The first step, select the osTicket file installation version. The following is the image of selecting osTicket version :
Just select the right version which is the Latest Release. The selection will appear as follows :
b. Next, it is the second step. Hence, just click the Next Step button to continue. The following image will appear :
c. Choose the language. In this step, just select all of the language. It appears on the following image :
d. Next, it is the third step. As usual, just click the Next Step button to proceed. The following image will appear :
Just select all the available Plugins just in case. Maybe some of the plugins will be useful somehow later on. If all the available Plugins is selected, the following image will appear :
e. Next, it is the fourth step. It is the last one. Just click the Next Step button and the following image will appear :
Just skip the above step for subcribing to osTicket Mailing Lists if it is not too important. Click the link on the left bottom of the form. That link has a label of ‘No Thanks’. The following image will appear :
Extracting the osTicket file installation
After downloading the file, extract it since it comes with a compressed format of .zip. Do it using the ‘unzip’ command. Perform it in the command line :
root@hostname:~# unzip osTicket-v1.10.4.zip
Archive:  osTicket-v1.10.4.zip
replace osTicket-v1.10.4.zip? [y]es, [n]o, [A]ll, [N]one, [r]ename: A
  inflating: osTicket-v1.10.4.zip
  inflating: ar.phar
  inflating: az.phar
  inflating: bg.phar
  inflating: ca.phar
  inflating: zh_CN.phar
  inflating: zh_TW.phar
  inflating: hr.phar
  inflating: cs.phar
  inflating: da.phar
  inflating: nl.phar
  inflating: et.phar
  inflating: fi.phar
  inflating: fr.phar
  inflating: de.phar
  inflating: el.phar
  inflating: hu.phar
  inflating: it.phar
  inflating: ja.phar
  inflating: ko.phar
  inflating: lt.phar
  inflating: mk.phar
  inflating: mn.phar
  inflating: no.phar
  inflating: fa.phar
  inflating: pl.phar
  inflating: pt_PT.phar
  inflating: pt_BR.phar
  inflating: ro.phar
  inflating: ru.phar
  inflating: sr_CS.phar
  inflating: sk.phar
  inflating: sl.phar
  inflating: es_ES.phar
  inflating: sv_SE.phar
  inflating: th.phar
  inflating: tr.phar
  inflating: uk.phar
  inflating: vi.phar
  inflating: auth-passthru.phar
  inflating: auth-ldap.phar
  inflating: storage-s3.phar
  inflating: storage-fs.phar
root@hostname:~#
Configure Apache Webserver in order to execute osTicket
The following part is for configuring the Apache Webserver. It is necessary for accessing osTicket via Web browser. Below are the steps :
1. After extracting the file, move it to the appropriate location. Normally, in Apache Webserver, all of the web source code files are in the folder or path of ‘/var/www/html’. So, move all of the files into that location.
2. The next step, configure the webserver that run osTicket. Simply put, it is to access osTicket installation page available in any Web browser. In this article, osTicket will run in Apache Webserver. So, configure the Apache Webserver so it can execute osTicket. Finishing the configuration will make the access to osTicket is possible via Web browser. Those step are in the following lists where the configuration is for the Apache Webserver in Linux Ubuntu 18.04 Bionic Beaver :
a. Create a new file configuration. For an example, the name of the file is ‘localhost.osticket.web’. The location is normally in the ‘/etc/apache2/sites-available’. The following is the step for creating the file configuration where the access to osTicket is for executing in the local environment :
root@hostname:/etc/apache2/sites-available# touch localhost.osticket.web
root@hostname:/etc/apache2/sites-available#
The following is the content of the file :
    ServerAdmin [email protected]
    ServerName localhost.osticket.web
    DocumentRoot /var/www/html/osticket/upload
    DirectoryIndex index.html index.php
    ErrorLog ${APACHE_LOG_DIR}/localhost.osticket.web.error.log
    CustomLog ${APACHE_LOG_DIR}/localhost.osticket.web.access.log combined
b. Activate the configuration file by executing the following command :
root@hostname:/etc/apache2/sites-available#  a2ensite localhost.osticket.web
Enabling site localhost.osticket.web.
To activate the new configuration, you need to run:
  systemctl reload apache2
root@hostname:/var/www/html/osticket/upload#
c. Reload the Apache Webserver, so the new configuration will have an effect. Execute the following command as it also suggest in the output of the above command :
root@hostname:/var/www/html/osticket/upload# systemctl reload apache2
3. In order to access the osTicket installation, configure it in ‘/etc/hosts’ as follows :
Access it from the Web browser by typing localhost.osticket.web. The following page will appear :
Installing osTicket
The last part, it is the installation part. It is where the installation of osTicket actually begins. Based on the output of the previous image, the current operating system or the current server still need a few things. Before going further to describe details on the steps to install osTicket, this part will also consists of two subpart. The first one is the part for resolving the requirement on installing osTicket. The second one is the part for the installation process of osTicket itself.
Resolving error to meet the requirement of osTicket installation process
There are several errors appear in the installation process of osTicket. In order to solve each of the error, the following are the process for resolving errors one by one :
Resolving error for Gdlib Extension requirement
Just Install php-gd. It will solve the requirement of Gdlib Extension. Just execute the following command to add php-gd library for solving the requirement problem.
First, search the package php-gd to check the existence. If it is exist, the installation of php-gd is possible. Search it using the command ‘apt search php-gd’ :
root@hostname:/var/www/html/osticket/upload# apt search php-gd
Sorting... Done
Full Text Search... Done
php-gd/bionic,bionic 1:7.2+60ubuntu1 all
GD module for PHP [default]
root@hostname:/var/www/html/osticket/upload#
Since it is available, try to install the package by executing the following command :
root@hostname:/var/www/html/osticket/upload# apt -y install php-gd
Reading package lists... Done
Building dependency tree
Reading state information... Done
The following additional packages will be installed:
php7.2-gd
The following NEW packages will be installed:
php-gd php7.2-gd
0 upgraded, 2 newly installed, 0 to remove and 3 not upgraded.
Need to get 29,1 kB of archives.
After this operation, 146 kB of additional disk space will be used.
Get:1 http://xxx.xxxxxxx.ubuntu.com/ubuntu bionic-updates/main amd64 php7.2-gd amd64 7.2.10-0ubuntu0.18.04.1 [27,1 kB]
Get:2 http://xxx.xxxxxxx.ubuntu.com/ubuntu bionic/main amd64 php-gd all 1:7.2+60ubuntu1 [1.996 B]
Fetched 29,1 kB in 5s (6.154 B/s)
Selecting previously unselected package php7.2-gd.
(Reading database ... 274249 files and directories currently installed.)
Preparing to unpack .../php7.2-gd_7.2.10-0ubuntu0.18.04.1_amd64.deb ...
Unpacking php7.2-gd (7.2.10-0ubuntu0.18.04.1) ...
Selecting previously unselected package php-gd.
Preparing to unpack .../php-gd_1%3a7.2+60ubuntu1_all.deb ...
Unpacking php-gd (1:7.2+60ubuntu1) ...
Setting up php7.2-gd (7.2.10-0ubuntu0.18.04.1) ...
Creating config file /etc/php/7.2/mods-available/gd.ini with new version
Setting up php-gd (1:7.2+60ubuntu1) ...
Processing triggers for libapache2-mod-php7.2 (7.2.10-0ubuntu0.18.04.1) ...
root@hostname:/var/www/html/osticket/upload#
2. Don’t forget to restart the service of Apache Webserver. The following is the command for restarting the service :
root@hostname:~# systemctl restart apache2
root@hostname:~#
3. And then, refresh the page. Next, the following image will appear :
4. According to the output image above, the requirement for Gdlib Extension is not a problem anymore.
Resolving error for PHP IMAP Extension requirement
For solving this error requirement, install php-imap library. Just type the following series of command to solve it.
First, search the package php-imap to check the existence. It is important for further installation :
root@hostname:/var/www/html/osticket/upload# apt search php-imap
Sorting... Done
Full Text Search... Done
php-imap/bionic,bionic 1:7.2+60ubuntu1 all
IMAP module for PHP [default]
root@hostname:/var/www/html/osticket/upload#
Since the package exist, install it by executing the following command :
root@hostname:/var/www/html/osticket/upload# apt -y install php-imap
Reading package lists... Done
Building dependency tree
Reading state information... Done
The following additional packages will be installed:
libc-client2007e mlock php7.2-imap
Suggested packages:
uw-mailutils
The following NEW packages will be installed:
libc-client2007e mlock php-imap php7.2-imap
0 upgraded, 4 newly installed, 0 to remove and 3 not upgraded.
Need to get 619 kB of archives.
After this operation, 1.612 kB of additional disk space will be used.
Get:1 http://xxx.xxxxxxx.ubuntu.com/ubuntu bionic/universe amd64 mlock amd64 8:2007f~dfsg-5build1 [11,3 kB]
Get:2 http://xxx.xxxxxxx.ubuntu.com/ubuntu bionic/universe amd64 libc-client2007e amd64 8:2007f~dfsg-5build1 [577 kB]
Get:3 http://xxx.xxxxxxx.ubuntu.com/ubuntu bionic-updates/universe amd64 php7.2-imap amd64 7.2.10-0ubuntu0.18.04.1 [28,9 kB]
Get:4 http://xxx.xxxxxxx.ubuntu.com/ubuntu bionic/universe amd64 php-imap all 1:7.2+60ubuntu1 [2.004 B]
Fetched 619 kB in 7s (91,9 kB/s)
Selecting previously unselected package mlock.
(Reading database ... 274261 files and directories currently installed.)
Preparing to unpack .../mlock_8%3a2007f~dfsg-5build1_amd64.deb ...
Unpacking mlock (8:2007f~dfsg-5build1) ...
Selecting previously unselected package libc-client2007e.
Preparing to unpack .../libc-client2007e_8%3a2007f~dfsg-5build1_amd64.deb ...
Unpacking libc-client2007e (8:2007f~dfsg-5build1) ...
Selecting previously unselected package php7.2-imap.
Preparing to unpack .../php7.2-imap_7.2.10-0ubuntu0.18.04.1_amd64.deb ...
Unpacking php7.2-imap (7.2.10-0ubuntu0.18.04.1) ...
Selecting previously unselected package php-imap.
Preparing to unpack .../php-imap_1%3a7.2+60ubuntu1_all.deb ...
Unpacking php-imap (1:7.2+60ubuntu1) ...
Processing triggers for libc-bin (2.27-3ubuntu1) ...
Setting up mlock (8:2007f~dfsg-5build1) ...
Processing triggers for man-db (2.8.3-2ubuntu0.1) ...
Processing triggers for libapache2-mod-php7.2 (7.2.10-0ubuntu0.18.04.1) ...
Setting up libc-client2007e (8:2007f~dfsg-5build1) ...
Setting up php7.2-imap (7.2.10-0ubuntu0.18.04.1) ...
Creating config file /etc/php/7.2/mods-available/imap.ini with new version
Setting up php-imap (1:7.2+60ubuntu1) ...
Processing triggers for libc-bin (2.27-3ubuntu1) ...
Processing triggers for libapache2-mod-php7.2 (7.2.10-0ubuntu0.18.04.1) ...
root@soulreaper:/var/www/html/osticket/upload#
After installing php-imap, don’t forget to restart Apache Webserver’s service. Do it exactly as in the previous step. Next, don’t forget to refresh the page exactly as in the previous step. The following image of the page will appear :
Resolving error for Intl Extension requirement
Continue on the next step to resolve the Intl Extension. In order to solve the problem of Intl Extension requirement, just type the following series of command.
First, make sure that the package exist. Search it using the following command :
root@hostname:/var/www/html/osticket/upload# apt search php-intl
Sorting... Done
Full Text Search... Done
php-intl/bionic,bionic 1:7.2+60ubuntu1 all
Internationalisation module for PHP [default]
root@hostname:/var/www/html/osticket/upload#
As in the above output, the package exist. Start installing the package by typing the following command :
root@hostname:/var/www/html/osticket/upload# apt -y install php-intl
Reading package lists... Done
Building dependency tree
Reading state information... Done
The following additional packages will be installed:
php7.2-intl
The following NEW packages will be installed:
php-intl php7.2-intl
0 upgraded, 2 newly installed, 0 to remove and 3 not upgraded.
Need to get 126 kB of archives.
After this operation, 524 kB of additional disk space will be used.
Get:1 http://xxx.xxxxxxx.ubuntu.com/ubuntu bionic-updates/universe amd64 php7.2-intl amd64 7.2.10-0ubuntu0.18.04.1 [124 kB]
Get:2 http://xxx.xxxxxxx.ubuntu.com/ubuntu bionic/universe amd64 php-intl all 1:7.2+60ubuntu1 [2.012 B]
Fetched 126 kB in 4s (30,9 kB/s)
Selecting previously unselected package php7.2-intl.
(Reading database ... 274300 files and directories currently installed.)
Preparing to unpack .../php7.2-intl_7.2.10-0ubuntu0.18.04.1_amd64.deb ...
Unpacking php7.2-intl (7.2.10-0ubuntu0.18.04.1) ...
Selecting previously unselected package php-intl.
Preparing to unpack .../php-intl_1%3a7.2+60ubuntu1_all.deb ...
Unpacking php-intl (1:7.2+60ubuntu1) ...
Setting up php7.2-intl (7.2.10-0ubuntu0.18.04.1) ...
Creating config file /etc/php/7.2/mods-available/intl.ini with new version
Processing triggers for libapache2-mod-php7.2 (7.2.10-0ubuntu0.18.04.1) ...
Setting up php-intl (1:7.2+60ubuntu1) ...
root@hostname:/var/www/html/osticket/upload#
As always, don’t forget to restart the Apache Webserver as in the previous step. Also, don’t forget to refresh the osTicket installation page. And then, the following image will appear :
Resolving error for APCu Extension requirement
The last problem, the requirement of APCu Extension. To solve this requirement, just type the series of the following command.
As usual, search the package first by typing the following command :
root@hostname:/var/www/html/osticket/upload# apt search PHP-APCu
Sorting... Done
Full Text Search... Done
php-apcu/bionic 5.1.9+4.0.11-1build1 amd64
APC User Cache for PHP
php-apcu-bc/bionic 1.0.3-2ubuntu2 amd64
APCu Backwards Compatibility Module
root@hostname:/var/www/html/osticket/upload#
The package exist. Continue on installing the package by typing the following command :
root@hostname:/var/www/html/osticket/upload# apt -y install php-apcu
Reading package lists... Done
Building dependency tree
Reading state information... Done
The following additional packages will be installed:
php-apcu-bc
The following NEW packages will be installed:
php-apcu php-apcu-bc
0 upgraded, 2 newly installed, 0 to remove and 3 not upgraded.
Need to get 56,4 kB of archives.
After this operation, 246 kB of additional disk space will be used.
Get:1 http://xxx.xxxxxxx.ubuntu.com/ubuntu bionic/universe amd64 php-apcu amd64 5.1.9+4.0.11-1build1 [48,1 kB]
Get:2 http://xxx.xxxxxxx.ubuntu.com/ubuntu bionic/universe amd64 php-apcu-bc amd64 1.0.3-2ubuntu2 [8.368 B]
Fetched 56,4 kB in 3s (22,5 kB/s)
Selecting previously unselected package php-apcu.
(Reading database ... 274312 files and directories currently installed.)
Preparing to unpack .../php-apcu_5.1.9+4.0.11-1build1_amd64.deb ...
Unpacking php-apcu (5.1.9+4.0.11-1build1) ...
Selecting previously unselected package php-apcu-bc.
Preparing to unpack .../php-apcu-bc_1.0.3-2ubuntu2_amd64.deb ...
Unpacking php-apcu-bc (1.0.3-2ubuntu2) ...
Setting up php-apcu (5.1.9+4.0.11-1build1) ...
Setting up php-apcu-bc (1.0.3-2ubuntu2) ...
root@hostname:/var/www/html/osticket/upload#
And again, don’t forget to restart Apache Webservice. Once again, refresh the osTicket installation page.
Fulfilling the osTicket installation requirement
After resolving all of the error to meet the requirement, the following step is the step to fulfill another requirement to install osTicket.
1. Click the Continue button to proceed on installing osTicket. The following image will appear :
2. Next, to solve this matter, just create a new file with the name of ‘ost-config.php’. According to the output above just type the following command inside the upload folder :
cp include/os-sampleconfig.php include/ost-config.php
Below is the execution of the above command :
root@hostname:/var/www/html/osticket/upload/include# cp ost-sampleconfig.php ost-config.php
root@hostname:/var/www/html/osticket/upload/include#
3. After creating the file, refresh the osTicket page installation. The image of the page will appear as the following :
4. Specifically as the instruction on the above output, do the following command :
root@hostname:/var/www/html/osticket/upload/include# chmod 0666 ost-config.php
root@hostname:/var/www/html/osticket/upload/include#
Based on the image above, click the ‘Done? Continue’ button after executing the above step.
The beginning of osTicket installation process
After solving all of the requirements, the following page of osTicket installation will appear :
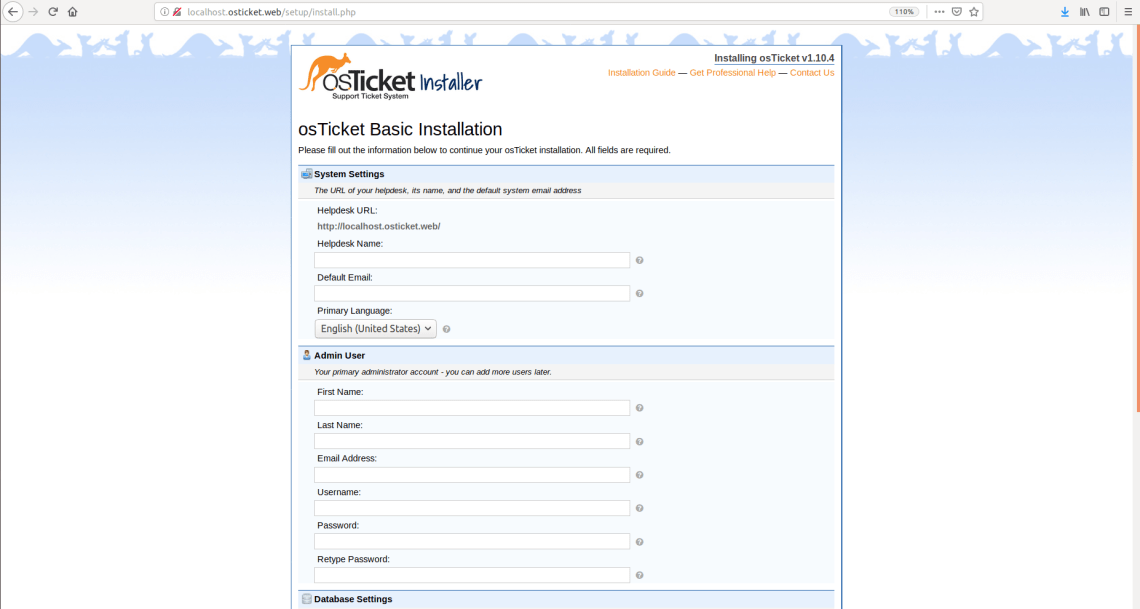
1. First of all, fill the above form and submit the form. Moreover, pay attention to an important part of the form. It is the Database Settings part. As the database, osTicket is using MySQL Database. So, don’t forget to create the database first. The database configuration must be suitable with all of the entry in the form as follows :
2. Surely, if the installation process is a success then the following page of osTicket will appear :
3. Access the URL page of the osTicket page as in the above output image. It is in the ‘Your osTicket URL’ link section. The following is preview of the first page in the osTicket web application :
By the time the above image is available upon accessing the URL link, the installation process of osTicket is finally finished.